
MLflow is an open-source platform for managing and tracking machine learning experiments. When used with the OpenAI Agents SDK, MLflow automatically:
- Logs all agent interactions and API calls
- Captures tool usage, input/output messages, and intermediate decisions
- Tracks runs for debugging, performance analysis, and reproducibility
This is especially useful when you’re building multi-agent systems where different agents collaborate or call functions dynamically
In this tutorial, we’ll walk through two key examples: a simple handoff between agents, and the use of agent guardrails — all while tracing their behavior using MLflow.
Setting up the dependencies
Installing the libraries
pip install openai-agents mlflow pydantic pydotenvOpenAI API Key
To get an OpenAI API key, visit https://platform.openai.com/settings/organization/api-keys and generate a new key. If you’re a new user, you may need to add billing details and make a minimum payment of $5 to activate API access.
Once the key is generated, create a .env file and enter the following:
OPENAI_API_KEY = <YOUR_API_KEY>Replace <YOUR_API_KEY> with the key you generated.
Multi-Agent System (multi_agent_demo.py)
In this script (multi_agent_demo.py), we build a simple multi-agent assistant using the OpenAI Agents SDK, designed to route user queries to either a coding expert or a cooking expert. We enable mlflow.openai.autolog(), which automatically traces and logs all agent interactions with the OpenAI API — including inputs, outputs, and agent handoffs — making it easy to monitor and debug the system. MLflow is configured to use a local file-based tracking URI (./mlruns) and logs all activity under the experiment name “Agent‑Coding‑Cooking“.
import mlflow, asyncio
from agents import Agent, Runner
import os
from dotenv import load_dotenv
load_dotenv()

mlflow.openai.autolog()                           # Auto‑trace every OpenAI call
mlflow.set_tracking_uri("./mlruns")
mlflow.set_experiment("Agent‑Coding‑Cooking")

coding_agent = Agent(name="Coding agent",
                     instructions="You only answer coding questions.")

cooking_agent = Agent(name="Cooking agent",
                      instructions="You only answer cooking questions.")

triage_agent = Agent(
    name="Triage agent",
    instructions="If the request is about code, handoff to coding_agent; "
                 "if about cooking, handoff to cooking_agent.",
    handoffs=[coding_agent, cooking_agent],
)

async def main():
    res = await Runner.run(triage_agent,
                           input="How do I boil pasta al dente?")
    print(res.final_output)

if __name__ == "__main__":
    asyncio.run(main())
MLFlow UI
To open the MLflow UI and view all the logged agent interactions, run the following command in a new terminal:
mlflow uiThis will start the MLflow tracking server and display a prompt indicating the URL and port where the UI is accessible — usually http://localhost:5000 by default.
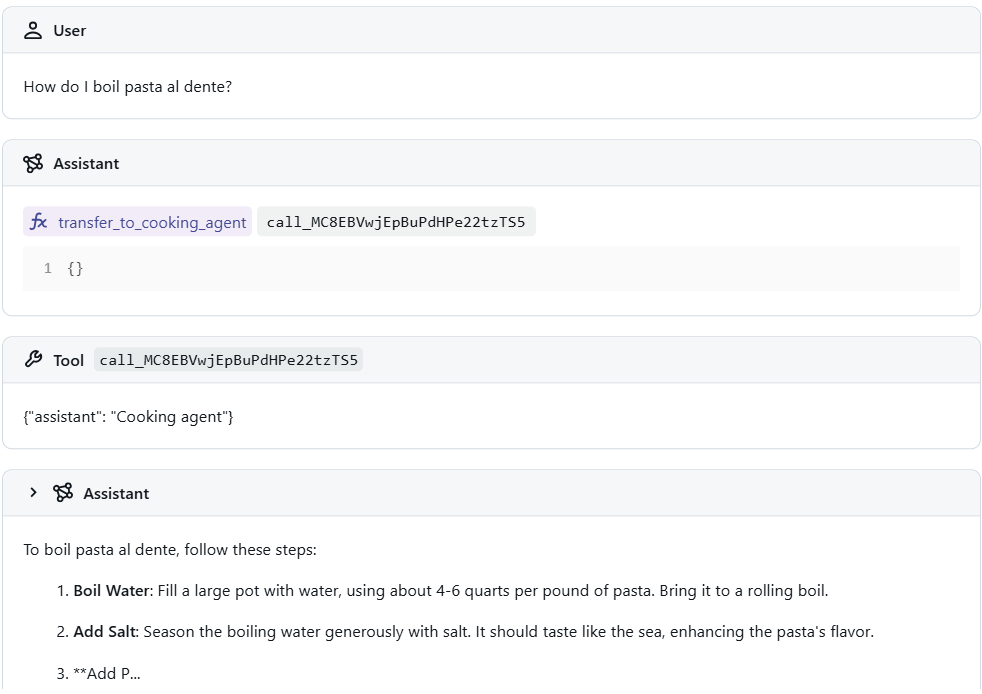
We can view the entire interaction flow in the Tracing section — from the user’s initial input to how the assistant routed the request to the appropriate agent, and finally, the response generated by that agent. This end-to-end trace provides valuable insight into decision-making, handoffs, and outputs, helping you debug and optimize your agent workflows.
Tracing Guardrails (guardrails.py)
In this example, we implement a guardrail-protected customer support agent using the OpenAI Agents SDK with MLflow tracing. The agent is designed to help users with general queries but is restricted from answering medical-related questions. A dedicated guardrail agent checks for such inputs, and if detected, blocks the request. MLflow captures the entire flow — including guardrail activation, reasoning, and agent response — providing full traceability and insight into safety mechanisms.
import mlflow, asyncio
from pydantic import BaseModel
from agents import (
    Agent, Runner,
    GuardrailFunctionOutput, InputGuardrailTripwireTriggered,
    input_guardrail, RunContextWrapper)

from dotenv import load_dotenv
load_dotenv()

mlflow.openai.autolog()
mlflow.set_tracking_uri("./mlruns")
mlflow.set_experiment("Agent‑Guardrails")

class MedicalSymptons(BaseModel):
    medical_symptoms: bool
    reasoning: str


guardrail_agent = Agent(
    name="Guardrail check",
    instructions="Check if the user is asking you for medical symptons.",
    output_type=MedicalSymptons,
)


@input_guardrail
async def medical_guardrail(
    ctx: RunContextWrapper[None], agent: Agent, input
) -> GuardrailFunctionOutput:
    result = await Runner.run(guardrail_agent, input, context=ctx.context)

    return GuardrailFunctionOutput(
        output_info=result.final_output,
        tripwire_triggered=result.final_output.medical_symptoms,
    )


agent = Agent(
    name="Customer support agent",
    instructions="You are a customer support agent. You help customers with their questions.",
    input_guardrails=[medical_guardrail],
)


async def main():
    try:
        await Runner.run(agent, "Should I take aspirin if I'm having a headache?")
        print("Guardrail didn't trip - this is unexpected")

    except InputGuardrailTripwireTriggered:
        print("Medical guardrail tripped")


if __name__ == "__main__":
    asyncio.run(main())
This script defines a customer support agent with an input guardrail that detects medical-related questions. It uses a separate guardrail_agent to evaluate whether the user’s input contains a request for medical advice. If such input is detected, the guardrail triggers and prevents the main agent from responding. The entire process, including guardrail checks and outcomes, is automatically logged and traced using MLflow.
MLFlow UI
To open the MLflow UI and view all the logged agent interactions, run the following command in a new terminal:
mlflow ui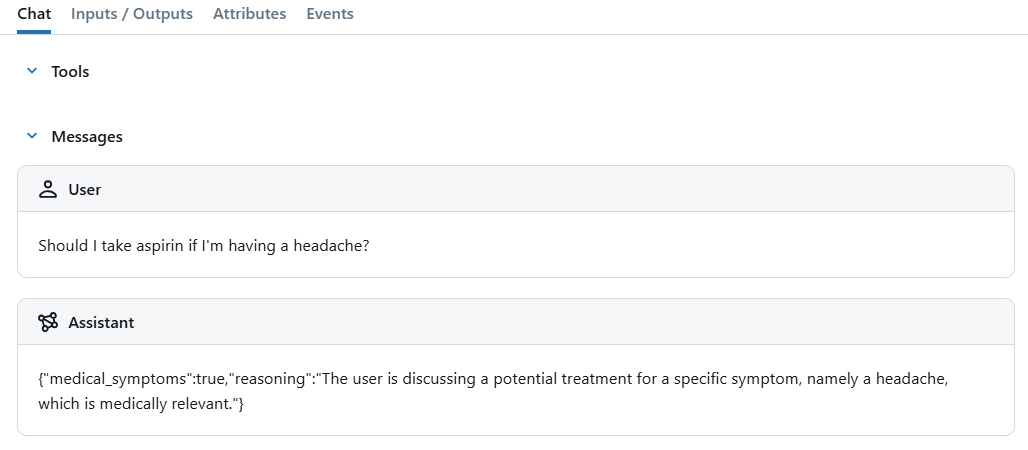
In this example, we asked the agent, “Should I take aspirin if I’m having a headache?”, which triggered the guardrail. In the MLflow UI, we can clearly see that the input was flagged, along with the reasoning provided by the guardrail agent for why the request was blocked.
| Check out the Codes. All credit for this research goes to the researchers of this project. Ready to connect with 1 Million+ AI Devs/Engineers/Researchers? See how NVIDIA, LG AI Research, and top AI companies leverage MarkTechPost to reach their target audience [Learn More] |
The post Tracing OpenAI Agent Responses using MLFlow appeared first on MarkTechPost.